
ACM Instruments prides itself on the after sales support we give. As part of this dedication we have produced our total care package, which includes the total tester software.
Should a problem arise it is important to find out where the fault lies. It is easy to blame the instrument when something is not working as it should, but on most occasions it is not the instrumentation that is at fault. To speed up this process, the total tester can not only check the instrumentation, but also guide you through possible causes.
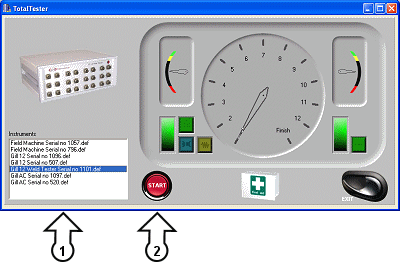
To begin with, run the instrument through the total tester to check if the instrument is functioning properly. If a test should fail, follow the advice given. If the instrument passes all tests, but you still believe there to be a problem, select the most relevant page in the list to the left.
There is no replacement for experience, so if you get stuck, just call us. Contact details can be found here.
Return to IndexNothing could be simpler, just select your instrument from the list, click the start button and follow the instructions on screen.
FAQ:
Q: Why is my instrument not on the list?
A: The Total Tester requires the version 5 sequencer software, so the most likely reason is your instruments software has not been installed to the same location as the total tester. Try re-installing the software to the same locations.
Q: Can I use the Total Tester with my old instruments?
A: As long as your old instrument runs the version 5 sequencer then yes. Instruments running both version 3.5 and 4 sequencer software can be upgraded free to version 5. For an up-grade to your software, either fill the form in the downloads section of our website (recommended) or e-mail support with your instruments serial number.
One of the common problems is lack of communication between PC and instrument.
Lets firstly check and double check the obvious:
- Is the instrument switched on? On standard instruments there will be a red indicator to show power is connected. If the power light is not illuminated then check the fuses, also check the correct voltage is selected on the rear panel.
- Is the RS-232/serial cable connected between the PC and instrument?
Now, sometimes the instrument or PC may lose the serial port, so turn off both, wait a couple of minutes and try again.
Still not working?
- Has the instrument ever been used and worked before with the PC? See below
- Is this a new PC that has never been used with the instrument before? See below
- Are you using a USB to serial adaptor, a PCI serial port card, or a serial port greater than 8? See below
Is the Instrument a field machine or other battery powered instrument? See the battery care section.
If you get stuck, don't panic, just contact ACM Instruments, we are here to help. See the Contacts section or website for details.
- Has the instrument been moved or transported recently? (see Loose connection guide)
- Is the serial cable the one supplied with the instrument? If not then contact ACM Instruments for a replacement, otherwise you can test the serial cable for continuity (see the Testing the serial cable guide)
- Are you using the correct software? Our software is serial number specific.
- Has the PC been used for any other propose? If so, find out what and see if the PC could have been damaged.
- If at all possible, try the instrument on another PC.
- Contact ACM instruments for more advice. If e-mailing, please include a note of what you have already tried and your serial number.
- Does the COM port work? Test it with another device, e.g., a serial mouse.
- If at all possible, try the instrument on another PC, preferably a different make.
- If the instrument has not worked since being shipped, then its possible a connector may have come loose in transit (see Loose connection guide)
- Is the instrument on the correct voltage? Check the voltage selector switch on the rear panel (front panel for field instruments).
- Check the continuity of the serial cable (see the Testing the serial cable guide)
- Are you using the correct software? Our software is serial number specific.
- Contact ACM instruments for more advice. If e-mailing, please include a note of what you have already tried and your serial number.
 When using USB or PCI serial ports, it may be possible that the port number is set greater than 8. All modern ACM Instruments are plug and play, this is achieved by the software searching available serial ports to find the instrument. By default, only the first 8 ports are searched. This can be increased by a program called the 'Serial port configuration'. This can be found under Start menu > All programs > ACM Instruments version 5 > Configuration.
Here you can see the number of ports to search is set to the default of 8. To change this simply enter the new number of serial ports to search. Using too large a number here will slow down the logging software.
The plug and play searching may affect other serial devices connected to the PC. If this is suspected, then use the 'Do not search' list to exclude the relevant serial ports.
Serial RS-232: (see here for USB)
There are two types of serial leads, ones for laboratory instruments and ones for field instruments. Only three connections are used, RX, TX and Gnd. The table below shows the connections, 25 pin connections are shown for historical reference only:
| Computer | Instrument | |||
| 9 pin female | 25 pin female (Older Style) |
Field Machine 9 pin male |
Laboratory 9 pin female |
25 pin male (Older Style) |
| 2 | 3 | 2 | 3 | 2 |
| 3 | 2 | 3 | 2 | 3 |
| 5 | 7 | 5 | 5 | 7 |
Laboratory instruments tend to use a 9 pin female to 9 pin female moulded cable with pins 2 and 3 'twisted'. Field instruments come with a 9 pin male to 9 pin female lead, either a ribbon cable with IDC connectors or a custom made lead (if the portable PC was available to ACM Instruments during manufacture).
If there is a problem with the serial cable, please contact ACM Instruments for a replacement.
Return to IndexACM Instruments USB instrumentation uses the FDTI chipset, this is also available in USB to Serial leads and adaptors, which ACM Instruments recommend. We have performed extensive testing on USB to serial devices and the FDTI chip sets are the ones which reliably work.
ACM USB Installation:
The following is applicable to ACM Instruments USB instrumentation and serial instruments using FDTI type serial to USB adaptors.
Insert the driver disk into the disk drive and connect the USB lead between the PC and the Instrument (the instrument does not need to be switched on at this point).
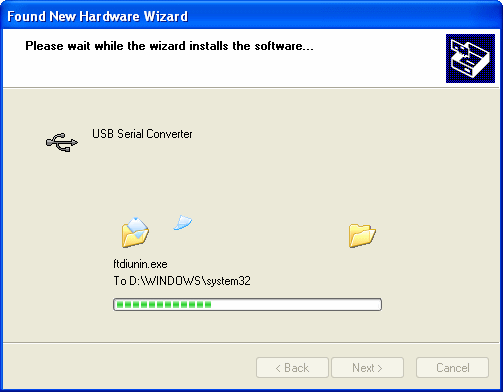
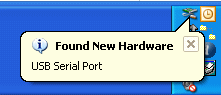 Windows should now detect the USB device. If Windows does not detect the USB device, check the lead between the PC and Instrument, also try disconnecting the USB cable from the PC, run FTDIUNIN.EXE on the driver disk and try again.
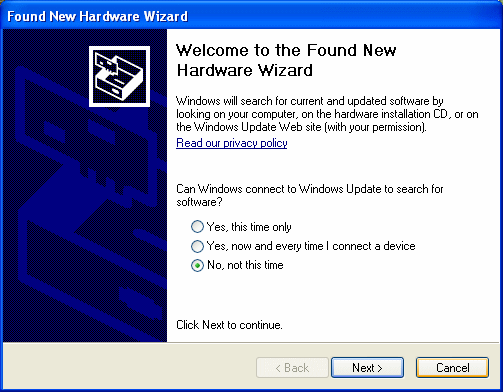 Windows may ask you if you wish to check Windows Update to see if there is a newer driver. Select “No, not this time”.
A newer driver may be available, but the drivers supplied have advanced settings, which will not be correctly set by the latest driver version. The version supplied has been thoroughly tested with our instrumentation.
Select Next.
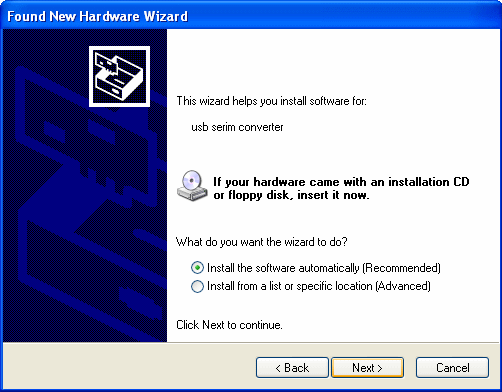 Select “Install the software automatically” and then next. If the install does not find the driver disk, you may need to select the “Install from list or specific location” option and locate the drivers manually.
Select Next.
 Driver for the USB Serial Converter should now be found. If it is not found, go back and use the advanced option to locate the driver disk manually.
Files required by the driver will now be copied to the PC.
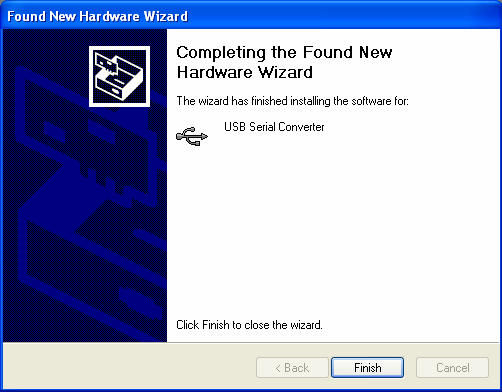 Once all the files have been copied, select Finished to close the Found New Hardware Wizard.
Note:
Windows will repeat all the above a second time for the Serial port.
Advanced Options
ACM Instruments USB interface uses the FTDI chip set. Drivers for this are readily available on the internet, including ACM Instruments website (www.acminstruments.com). However, specific advanced settings are required. If the instrument fails to communicate, check the advanced timeout settings in Windows Device Manager. Incorrect settings can also cause false readings.
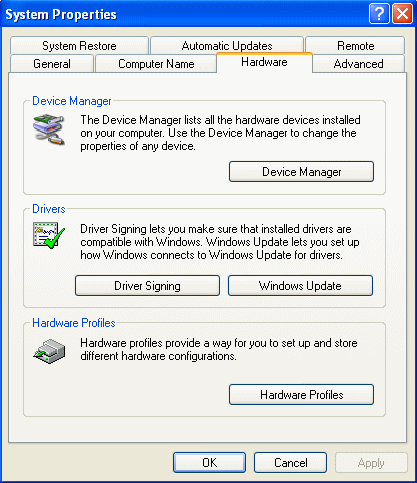 To launch the Device manager, right click on the “My Computer” icon (either on the Desktop or the Start menu) and select Properties, or press the Windows key and Break key.
Under the Hardware section, select Device Manager.
 In the Device Manager, under the Ports list, select the USB Serial Port. Make sure the instrument is connected to the PC via the USB cable supplied. There will be more than one USB port listed if you have several instruments connected to the PC, so to locate the correct one, disconnect all other instruments from the PC.
Right click on the required USB Serial port and select Properties.
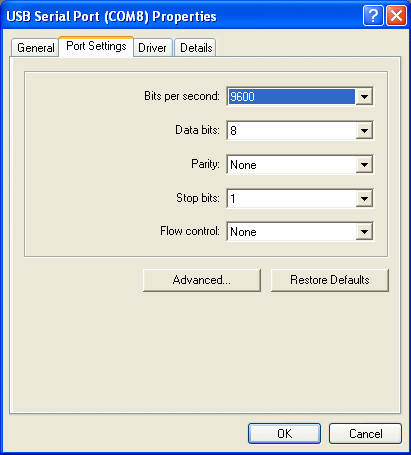 On the serial port properties page, select the Advanced option.
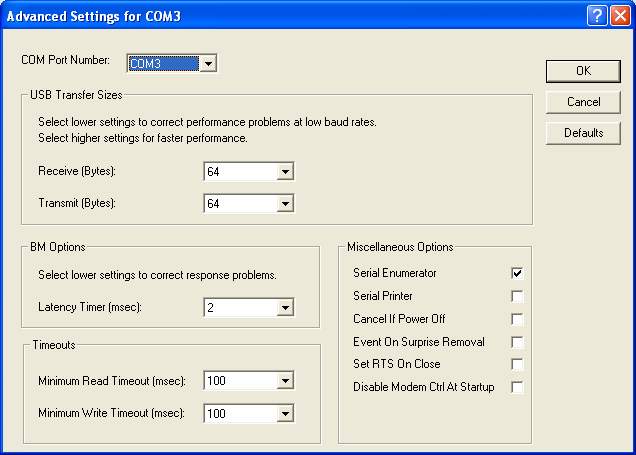 On the advanced page, change the Receive and Transmit USB transfer sizes to 64 (Bytes). Set the latency timer to 2 (msec). The Maximum Read and Write timeouts to 100 (msec).
Using USB Hubs
Our USB devices are USB 2, which should be downwardly compatible with USB 1. However, it is always best to use a hub that is Fast USB 2 compatible.
If periodic problems occur, check if the PC is Fast USB 2 compatible. If it is not, then try the instrument on a PC which is USB 2 compatible.
If you have any trouble installing the USB drivers, please contact ACM Instruments.
The main cause of losing communication is a poor serial port on the PC. Historically poor serial ports are more common to older named make PC's.
If at all possible, try the instrument on another PC, preferably a different make and a fairly new model.
If it does appear to be the PC's serial port, then solutions are to either install a quality PCI serial card or a USB to serial converter. Not all USB to serial adaptors work, please see the USB connectivity section. For advice please contact ACM Instruments direct.
If the instrument is a field/battery operated instrument, then it could be caused by the battery (see the battery care section).
Another possible causes could be a poor mains supply. Avoid using UPS, they sometimes produce a crude square wave. Avoid powering the PC and instrument from the same mains supply as high power equipment, such as pumps and heaters, in these situations try running an extension lead from a near by office which may be on a different mains ring.
If the cause still can't be found, don't panic, contact ACM Instruments for advice.
The most common reasons for results looking wrong are:
- Noise pick up in the cell
- Poor connections between the instrument and cell
- Wrong connections being used
- Wrong test parameters being set in the sequencer
If none of these appear to cover the problem you are experiencing, then contact ACM Instruments for advice.
Noise pickup in the cell:
Typically when using a remote reference electrode. To test for this, try replacing remote reference for a piece of stainless steel (you could borrow a spoon from the canteen or use same material as the working electrode) and place it in the bulk solution. Try the experiment again. If the results look promising, then what you need is a noise reduction probe (see the products and applications sections on our website).
Poor connections:
Pretty obvious, check the connections are making a good contact. If they look corroded then clean them with a suitable product. Test all connections with a continuity or ohm meter.
Wrong connections being used:
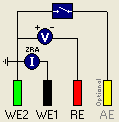
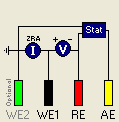
Most common is the misuse of WE2. On each setup page in the sequencer is a diagram showing which connections are used.
|
In this instance AE is not used. Typically used for current and voltage monitoring |
In this instance WE2 is not used. Typically used for techniques which polarise the cell. |
Another common occurrence is when the crocodile clip of WE2 has been held out of the way, by clipping it back to the wire of either of the three other leads. In this instance, the crocodile clip will cut through the insulation on the wire and short out WE2 with the other electrode lead.
Wrong test parameters being set in the sequencer:
Common mistakes made here are fixing the counter resistor on range which is not suitable for the test (best using the Auto settings for counter resistors) or current limits being set from a previous experiment. On each techniques setup page in the sequencer, there is a default button. Select the default button and then make the changes you require.
If cared for well, batteries can last for well over 3 years. However, misuse can reduce their life to a year or less. Put simply, lead acid batteries like to be charged all the time and not left discharged.
A faulty battery can cause the instrument to lose contact with the PC or just not work at all.
To test the battery, leave the instrument on charge for and hour or so and then leave off charge for a few minutes. Examine the field machine car battery connection, you will see four pins, measure the potential between the top pin and either pin to the left or right. The potential measured should be around 12v. Turn the instrument on and see that the potential does not reduce by a great amount. Connect the mains supply, so the instrument starts to charge and the potential measured should increase up to about 13.7vdc. If any of these potentials look wrong, contact ACM Instruments for advice.
Caring for your battery:
- Keep the instruments battery charged at all times.
- Do not allow the battery to totally discharge.
- If mains is available, use it.
- Do not power a portable PC from the field machines 12vdc, unless it is absolutely necessary.
- Do not power a portable PC from the field machines 12vdc, when charging the field machine from flat.
- Avoid excessive temperatures.
- In extremely hot conditions, operate the instrument from an air conditioned vehicle, if possible.
Contact ACM Direct
Details correct at time of writing, however these may sometimes change. Please visit our website for the most up-to-date information.
Sales & Marketing and Support
Andrew Haworth:
Telephone
Phone: +44 (0)15395 59185
Fax: +44 (0)15395 58562
Telephones are manned by trained personnel 8am to 4:30pm (BST)
Address
ACM Instruments,
125 Station Road,
Cark,
Grange-over-Sands,
Cumbria.
LA11 7NY
United Kingdom
Website
International Sales
International dealers provide a local ACM presence, please visit our website for contact details.