
Inside an ACM Instrument there are a number of interconnecting wires between the circuit board, power supply, front panel and rear panel. These connections are usually made by small white plugs and sockets. It is not unknown that these have come adrift epecially if couriers bash the instrument during delivery.
It is worth checking these connections before returning instruments back to ACM for repair.
1. Disconnect all power supplies to the instrument, all electrode leads and communication leads.
2. Remove the lid or front panel
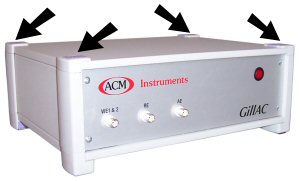
 Field machine - Remove all the pan head screws around the outside edge of the front panel, not the countersunk screws. Using the serial connector screwed into the front panel or a flat head screwdriver in the corner, gently lift the panel from the rear, until you can see if there are any loose connections. Take care as the front panel is quite heavy.
 Gill AC - Slide the 4 purple corners towards the centre of the instrument, this will revile 4 screws, remove these screws and the 4 plastic corners, lift the lid gently upwards, disconnect the earth lead to the lid. When replacing the lid, remember the earth connection and do not over tighten the 4 corner screws, this will crack the plastic corners.
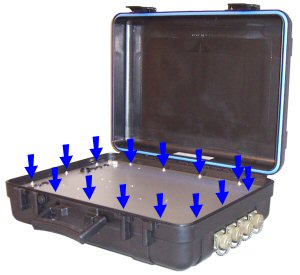
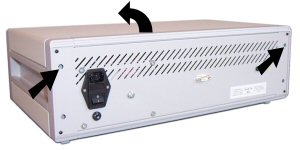 Gill 8 or 12 - There are 4 holes, one in each corner of the rear panel, possibly filled by small white plastic covers. In the holes are 4 screws, gently loosen the top two screws, but do not remove them completely. A small amount of lifting on the rear of the lid will let you know when the screws are loose enough. Lift the lid off the instrument rear first, taking note which way around the lid goes. To refit the lid, slide the front edge in first, then lower the rear and tighten up the two screws.
3. Visually examine the interior of the instrument, looking for any loose connections, or even IC's. Each connector is labelled with a number that corresponds to a number on the circuit board.
If you have any doubts about taking apart an ACM Instrument, then please contact ACM before doing so.
ACM Instruments prides itself on the after sales support we give. As part of this dedication we have produced our total care package, which includes the total tester software.
Should a problem arise it is important to find out where the fault lies. It is easy to blame the instrument when something is not working as it should, but on most occasions it is not the instrumentation that is at fault. To speed up this process, the total tester can not only check the instrumentation, but also guide you through possible causes.
To begin with, run the instrument through the total tester to check if the instrument is functioning properly. If a test should fail, follow the advice given. If the instrument passes all tests, but you still believe there to be a problem, select the most relevant page in the list to the left.
There is no replacement for experience, so if you get stuck, just call us. Contact details can be found here.